This post may contains affiliate links. Read our full disclosure here.
Knowing how to style a bar cart is one of those home skills that pays off every single time you have people over — and honestly, even when you don’t. A well-styled bar cart does double duty as a functional entertaining station and a piece of living room decor in its own right. I have been styling bar carts in my own home and helping friends set theirs up for years, and the difference between a bar cart that looks pulled-together and one that looks like a liquor store shelf comes down to a handful of principles anyone can learn. This is the complete guide to how to style a bar cart for entertaining: from choosing the right cart and stocking it thoughtfully to the layering tricks that make it look styled rather than just cluttered.
Why a Bar Cart Is One of the Best Investments for Your Home
A bar cart earns its place in a home the way few pieces of furniture do. It is functional — it gives you a dedicated, organized home for all your entertaining supplies so you are not hunting through cabinets when guests arrive. It is decorative — a well-styled bar cart adds personality to a living room or dining area in a way a sideboard or bookshelf rarely does. And it is social — having a designated bar area signals to guests that your home is a place where good things happen.
The biggest mistake I see with bar cart styling is treating the cart purely as storage. People line up bottles, add a few glasses, and call it done. What makes a bar cart look genuinely stylish rather than functional-but-forgettable is the same thing that makes any well-designed vignette work: intentional layering of heights, textures, and a few decorative elements that have nothing to do with drinking. A small plant, a candle, a marble tray, a linen cocktail napkin stack — these are the details that elevate a bar cart from stocked to styled.
“A bar cart is the only piece of furniture in your home where you can display your taste in interior design and your taste in wine at the same time. Get both right and it becomes one of the most commented-on corners of your home.”
The good news: styling a bar cart is genuinely one of the more forgiving decorating projects in a home. You can restyle it seasonally with minimal effort, swap out bottles as your tastes change, and adjust the look entirely with just a few new accessories. It is also one of the easier rooms of the house to make look polished even on a budget, because the bottles themselves — which you are buying anyway — are part of the decor.
Choosing the Right Bar Cart: Size, Style, and Finish

Before you can style a bar cart, you need to choose one that works for your space and aesthetic. Here is how I think about it:
- Size. A two-tier cart is the standard and the most versatile. The top tier holds your active entertaining setup — bottles, glasses, tools, and decorative elements. The bottom tier holds overflow: extra bottles, a wine rack insert if you want one, napkins, or a small ice bucket. For smaller spaces, a one-tier cart or a slim two-tier works well; for a dedicated bar area in a larger room, a wider three-tier cart gives you more surface to work with.
- Finish. Gold and brass are the most popular finishes right now and pair well with warm neutral interiors, maximalist spaces, and anything with velvet or warm wood tones. Black iron reads more industrial and modern and works especially well in cooler, more monochromatic rooms. Chrome and silver are cleaner and more contemporary, ideal for minimalist or Scandi-influenced spaces. Mixed metal (brass frame with glass shelves) is the most versatile and is currently the format I recommend most for first-time buyers. Browse bar cart styles on Amazon to compare finishes and sizes before committing.
- Shelf material. Glass shelves are classic and allow light to pass through, which makes the cart feel lighter in a room. Mirrored shelves add glamour and reflect the bottles beautifully. Wood shelves are warmer and more casual — better for a cozy, collected look than a polished entertaining aesthetic.
- Wheel quality. This sounds minor but matters: if your cart has wheels, make sure they lock. A bar cart that rolls away when you are trying to pour from it is not just annoying — it is a glass-shattering risk. Check the wheel lock mechanism before buying.
- Height. Standard bar cart height is around 33-36 inches, which is comfortable to pour from standing. If your space has lower furniture (mid-century modern, floor-level seating), a shorter cart keeps the room proportions more balanced.
For furniture-quality bar carts that are built to last and look genuinely designed rather than assembled, TOV Furniture has a strong selection of bar carts in brass, gold, and black finishes that hold up well to daily use.
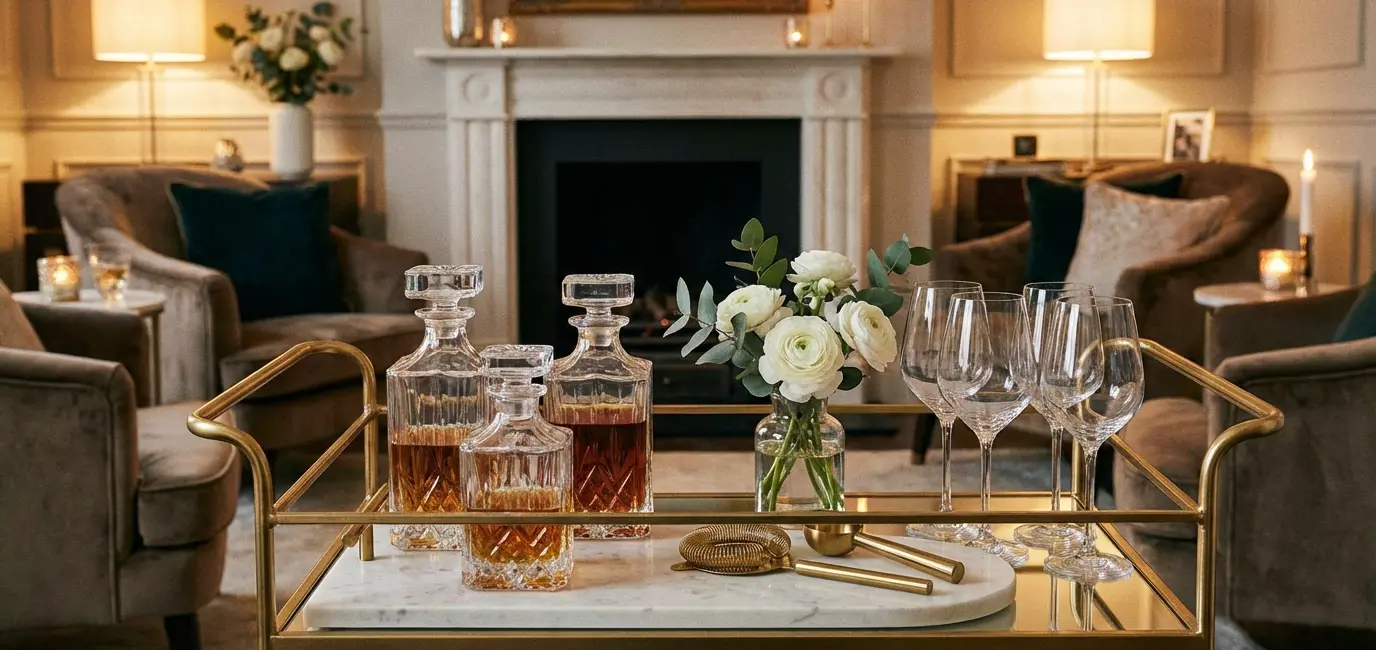
How to Style a Bar Cart: The Layering Method
The layering method is how professional stylists approach any vignette — a bookshelf, a coffee table, a mantel — and it translates directly to bar cart styling. The principle is simple: vary heights, mix textures, and balance functional items with purely decorative ones. Here is how I apply it to a bar cart:
- Layer 1: The tall anchors. These are your tallest items and they go at the back of the top tier. Bottles are the natural choice — a 750ml wine or spirits bottle is typically 12 inches tall and creates an immediate sense of abundance and purpose. Group two or three bottles together at the back left or right corner, with labels facing forward. A tall glass decanter works here too, especially if you want a more decorative look than a standard wine bottle provides.
- Layer 2: The mid-height items. These sit in front of or beside the tall anchors and include your glassware, a cocktail shaker, and any medium-height decorative objects. A set of coupes or wine glasses stacked or arranged in a small cluster works well here. A cocktail shaker — especially a polished stainless or gold-finish one — reads as both functional and decorative.
- Layer 3: The base layer. This is where your horizontal items and trays go. A small marble or wooden tray in the front center of the top tier corrals your smaller tools (jigger, bar spoon, strainer) and creates a contained vignette within the larger one. This tray is also where I place my one purely decorative item: a small bud vase with a single stem, a votive candle, or a small succulent.
- The decorative wildcard. Every well-styled bar cart needs at least one item that has nothing to do with drinking. This is the element that makes it look curated rather than stocked. A small stack of coasters tied with a ribbon, a couple of cocktail recipe books propped vertically, a small framed print, a cluster of pillar candles — any of these signals that someone thought about this space rather than just filling it.
- The bottom tier. Keep this more functional and less styled. Extra bottles lying on their sides (especially wine bottles), a spare set of glasses, a linen cocktail napkin stack, a small ice bucket. The bottom tier supports the top tier rather than competing with it.
- The edit. Once everything is in place, step back and remove one item. Overcrowding is the most common bar cart styling mistake. If every inch is filled, nothing stands out. Negative space — a bit of visible shelf between items — is part of the look.
For more guidance on creating intentional vignettes throughout your home, the same principles that apply to bar cart styling apply to coffee table styling and to the broader quiet luxury home decor approach that emphasizes restraint and quality over quantity.
What Bottles to Keep on a Bar Cart (and How to Arrange Them)
A bar cart should reflect what you actually drink and serve, not what you think it should look like. That said, there are some practical and aesthetic considerations that help you decide which bottles to display and how to arrange them.
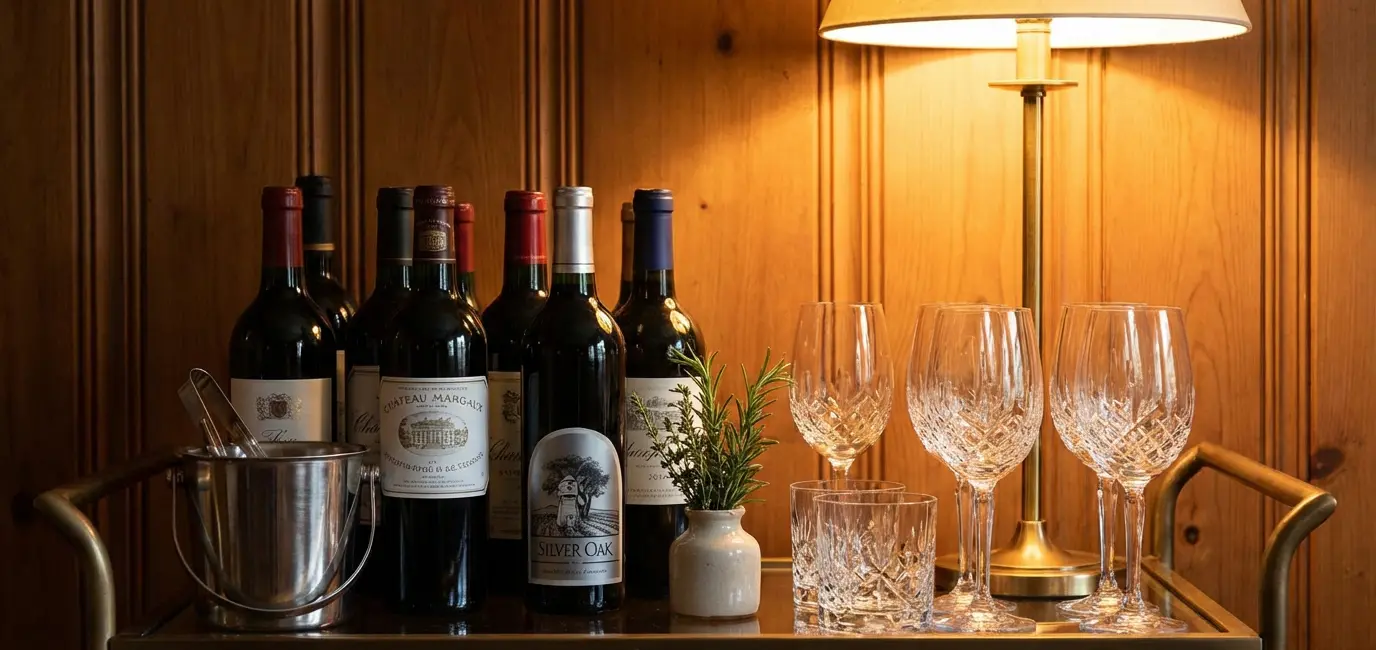
- The core spirits trio. For a classic entertaining bar cart, anchor it with three bottles that cover the range of what most guests might want: a gin or vodka (clear, clean bottles with interesting labels), a whiskey or bourbon (amber liquid is visually warm and beautiful in a glass decanter), and a tequila or mezcal (increasingly the cocktail centerpiece at gatherings). These three cover most standard cocktail builds and look good together.
- Wine on the bar cart. Wine bottles are beautiful on a bar cart — the tall silhouette, the label design, the variety of colors from the glass. I recommend keeping 1-2 open bottles that you are actively serving from, plus a small wine rack insert on the bottom tier for 2-3 unopened bottles. White wines and sparkling wines work especially well on a displayed cart because they signal a lighter, more celebratory entertaining style.
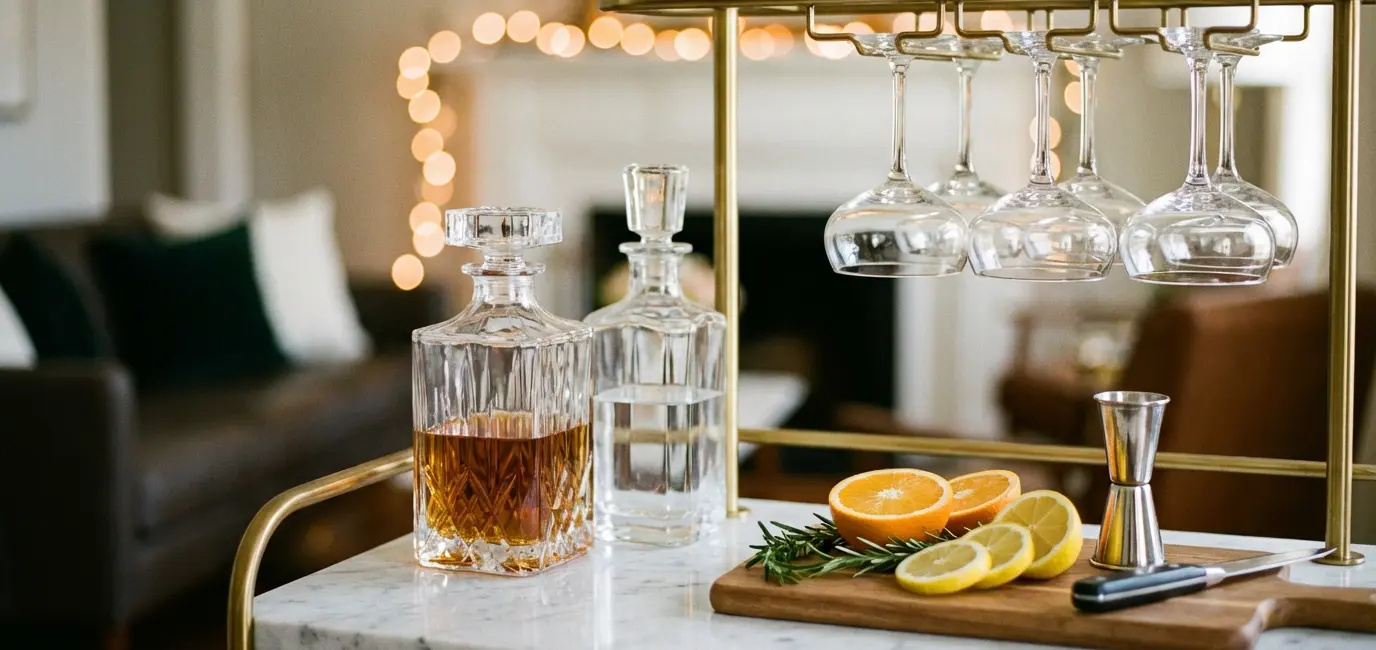
- Decanters. Moving your whiskey or red wine into a crystal decanter is one of the single most effective upgrades you can make to bar cart aesthetics. The amber liquid in a cut crystal decanter catches light in a way a labeled bottle never does. Crystal decanter sets range from $25 to $150+ and the investment in even a mid-range set is immediately visible on a styled cart.
- Bottle arrangement principles. Labels always face forward. Cluster bottles in odd numbers (3 is ideal, 5 for a larger cart). Vary the heights by including a 750ml standard bottle alongside a taller 1L bottle or a shorter half-bottle. Keep the most decorative or unusual bottle at the focal point — usually front-right or front-left on the top tier where it catches the eye first.
- What to take off the cart. Anything that looks cluttered, half-empty in an unattractive way, or has a label design that clashes with your aesthetic. Half-empty bottles with peeling labels belong in a cabinet. The bar cart is your curated display, not your full liquor inventory.
If you are setting up a more comprehensive home bar beyond the cart itself — including storage, a full glassware collection, and a dedicated bar area — our complete home wine bar setup guide covers everything from shelving to wine storage to the full tool kit.
Bar Cart Glassware: What You Actually Need

Glassware is both functional and one of the most visually significant elements of a styled bar cart. The shapes, the clarity, the way they catch light — glassware is where the visual elegance of a well-styled bar cart really lives. Here is the edited list of what actually belongs on a cart:
- Wine glasses (4-6). Standard all-purpose wine glasses are the most versatile and take up the least space. They work for red, white, and rosé and look clean and intentional on a cart. Crystal wine glass sets in a slim, classic silhouette read more elevated than oversized bowl shapes on a cart display. Hang them upside down from a hanging rack if your cart has one, or cluster them in two groups of two.
- Coupe glasses (4). The coupe — the wide, shallow cocktail glass — is having an extended moment and for good reason: they stack gracefully, photograph beautifully, and work for everything from spritzes to champagne to classic cocktails. If you only add one non-wine glass to your bar cart, make it coupes.
- Rocks glasses (2-4). Short, heavy-bottomed glasses for whiskey, negronis, and any spirit served on the rocks. Two is enough for a displayed cart; four if you entertain regularly with cocktail-forward crowds. Choose glasses with visible weight and good clarity.
- What you can skip on the cart. Highball glasses (these are better stored in a cabinet — their tall profile makes them hard to group attractively), novelty glasses, mismatched sets that break the visual cohesion of your display. The goal is a glassware selection that looks like it was chosen, not collected.
- Cocktail tools. A cocktail shaker, a jigger, a bar spoon, and a strainer are the four essential tools. Keep them corralled on a small tray on the top tier so they read as a curated group rather than individual items scattered across the surface. A cocktail shaker set that matches your cart finish (gold tools on a brass cart, silver on a chrome cart) ties the whole look together.
- The ice bucket. A small, attractive ice bucket on the bottom tier — or on the top tier if there is room — is both functional and adds a hospitality signal that guests notice. Stainless steel, hammered copper, or acrylic all work depending on your aesthetic. An ice bucket with tongs is one of the most practical $20-40 additions to any entertaining setup.
Seasonal and Occasion Bar Cart Styling Ideas
One of the best things about a bar cart is how easily it restyles for different seasons and occasions. The bones stay the same — bottles, glassware, tools — but a few swapped accessories can completely change the mood. Here are the seasonal variations I return to most:
- Spring entertaining. Swap in a small vase of fresh tulips or ranunculus. Replace the amber whiskey decanter with a clear gin or a rosé wine bottle. Add a small bowl of fresh citrus — lemons and limes — as both garnish and decoration. The palette shifts lighter and brighter, which matches the season. A bar cart styled for spring should feel as fresh as a garden party.
- Summer cocktail cart. This is where the bar cart becomes an outdoor entertaining piece if you have a covered patio or garden space. Bring it out for a party, stock it with a tequila and a vodka, add a citrus bowl and fresh herbs (mint, basil), and set out a pitcher of still water and glasses. The bar cart becomes a self-serve cocktail station that guests gravitate toward naturally. For hosting inspiration, our spring dinner party menu ideas and girls’ night in ideas both pair naturally with a styled bar cart setup.
- Fall and winter richness. This is the season where the bar cart comes into its own visually. Bring in amber tones: a whiskey decanter front and center, cognac or an aged rum, a cluster of pillar candles in warm tones. Add a small bowl of whole spices — cinnamon sticks, star anise, cloves — that double as garnish and scent. The palette goes deeper and warmer, and the cart starts to look almost cozy.
- Holiday styling. A small string of warm white lights draped along the top tier back. A cluster of metallic ornaments in a glass bowl. Champagne coupes front and center with a sparkling wine on display. The holiday bar cart is one of the most photographed corners of a home in December and takes about fifteen minutes to style from your regular setup.
- The dinner party setup. When you are hosting a specific event, the bar cart becomes a service station. Add a small handwritten sign or a chalkboard tag naming the signature cocktail. Pre-batch the cocktail in a beautiful pitcher or decanter so guests can help themselves. Set out a small bowl of garnishes and a clean cocktail napkin stack. The bar cart for entertaining functions as a self-contained hospitality moment that frees you from bartending all evening.
- The wine-focused cart. Not every bar cart needs to be a cocktail cart. If wine is more your thing, commit to that identity: a wine rack insert on the bottom tier, a decanter for red wine on the top, a selection of white and sparkling bottles in a small ice bucket, and beautiful wine glasses as the primary glassware. This is the cart version of a home wine tasting setup and it reads distinctly as a wine lover’s home.
For more home styling ideas that apply the same principles of intentional curation and quality over quantity, our guide to making your home feel like a luxury hotel covers the broader approach, and the quiet luxury home decor guide is the best reference for applying a refined, understated aesthetic throughout your space. If you are hosting a wine-forward evening, pair your styled bar cart with a blind wine tasting party format for an evening your guests will genuinely remember.
Frequently Asked Questions
How many bottles should be on a bar cart?
Three to five bottles is the sweet spot for a styled bar cart. Fewer than three looks sparse; more than six starts to look cluttered and more like storage than decor. The key is choosing bottles that serve different purposes — a spirit, a wine, a mixer base — and that have label designs or bottle shapes that work visually together.
What should go on the bottom shelf of a bar cart?
The bottom shelf is your functional overflow: extra bottles lying on their sides, a spare set of glasses, a linen cocktail napkin stack, a small ice bucket, or a wine rack insert for 2-3 unopened bottles. The bottom shelf supports the top tier rather than competing with it visually, so keep it tidier but less styled.
How do I style a bar cart on a budget?
Start with what you already have: your existing bottles, a few glasses, and any small decorative objects. Add a marble or wooden tray (Amazon, $15-30), a single bud vase with a fresh flower ($5), and a linen cocktail napkin stack (Amazon, $10-15). These three additions cost under $60 total and make a significant visual difference. You do not need an expensive cart or designer glassware to make a bar cart look styled.
Should a bar cart match other furniture in the room?
It does not need to match exactly, but it should be in conversation with your other finishes. A brass bar cart in a room with brass hardware reads intentional. A black iron cart in a room with wood and matte black accents works well. If your room is very mixed, a clear glass and chrome cart is the most neutral option. The most important thing is that the cart feels like it was chosen for the room rather than placed there by accident.
Where should I put a bar cart in my home?
The most common placement is in the living room, either against a wall as a vignette or in a corner where it can be accessed from multiple angles. Dining rooms work well for a cart that serves a table. Avoid placing a bar cart in high-traffic pathways where people brush against it, and keep it away from direct sunlight, which fades labels and can warm wine stored on the cart.
How often should I restyle my bar cart?
A light seasonal restyle — swapping one or two decorative elements for season-appropriate ones — is enough to keep it feeling fresh. A full restyle takes about fifteen minutes. Beyond seasonal changes, restyle whenever the cart starts to feel cluttered: pull everything off, wipe the shelves, and put back only what earns its place.
The best bar cart setups share one quality: they feel like they belong to the person who made them. Whether your taste runs to gleaming brass and crystal decanters or a more casual collected look with mismatched vintage glasses and a few great bottles, the principles of how to style a bar cart remain the same — vary heights, add at least one purely decorative element, keep the edit tight, and make sure the cart reflects what you actually enjoy serving. Get that right and you will have a corner of your home that guests gravitate toward, a setup that makes entertaining easier, and a piece of decor that genuinely earns its space in the room. That’s the best thing a well-styled bar cart for entertaining can do.